
21 Primavera Tips & Shortcuts
If you need help with Primavera scheduling, our experienced team can quickly develop a managing schedule for your project, whether large or small. Find out how a Primavera scheduler at VIATechnik can help you or visit our BIM services.
1. Spot Open Ends In The Activity Network
An important health check to perform before issuing a schedule is to remove open ends in the activity network. A good starting point is to look for the list of activities without predecessors/ successors in the Scheduling/Leveling Report, which can be accessed from the Schedule window (F9 or Tools>Schedule>View Log). A sample of this section of the report is shown below:
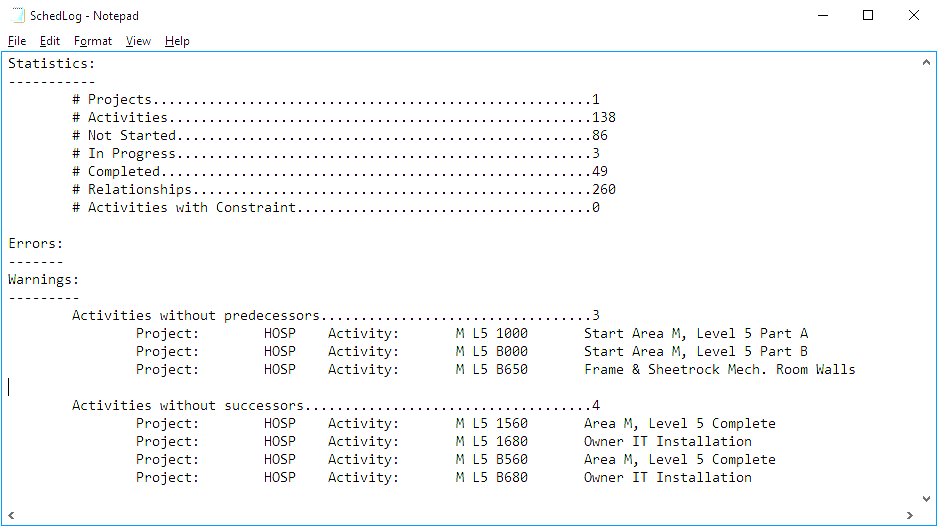
Note that open ends are also generated by activities whose i) only predecessor relationship is a finish-to-finish link or ii) only successor relationship is a start-to-start link. This check can be performed manually within P6 by looking at relationship lines on the Gantt chart or looking at predecessors/ successors in the Activity Details window, or through the Schedule Check utility available in Primavera Risk Analysis, or other schedule analysis software with similar capabilities.
2. Project-level Settings: Using the Defaults Tab
The Defaults tab under project settings can save you a lot of time if you need to add multiple activities with the same calendar, duration type, percent complete type, activity type, cost account, and/or even a given ID structure. In other words, there is a way you can pre-assign a given value to each of these settings for all new activities you insert into the schedule, eliminating the need to edit them on a per-activity basis after you’ve added the new tasks.
In order to do this, go to the Projects window, select the project you’re working on, and then locate the Defaults tab at the bottom of the screen, where the Project Details are displayed. If the Defaults tab is not visible, make sure you right-click anywhere in the Project Details area, choose “Customize Project Details” from the drop-down menu and move Defaults to the Displayed Tabs list on the right. Once you access this tab, you’ll be able to select pre-determined values for all the parameters mentioned above.
3. Renumber Activity IDs
Although P6 is more flexible than P3 when it comes to changing activity IDs, making edits for multiple activities can be cumbersome—especially if you’re dealing with, say, more than 10 activities or even worse: renumbering an entire schedule. In order to renumber multiple activities, all you need to do is highlight the line items whose IDs you need to update, right-click and select “Renumber Activity IDs”. You will then be prompted to i) define an increment value, ii) define prefix/suffix, or iii) replace characters in the current numbering structure of the selected activities.
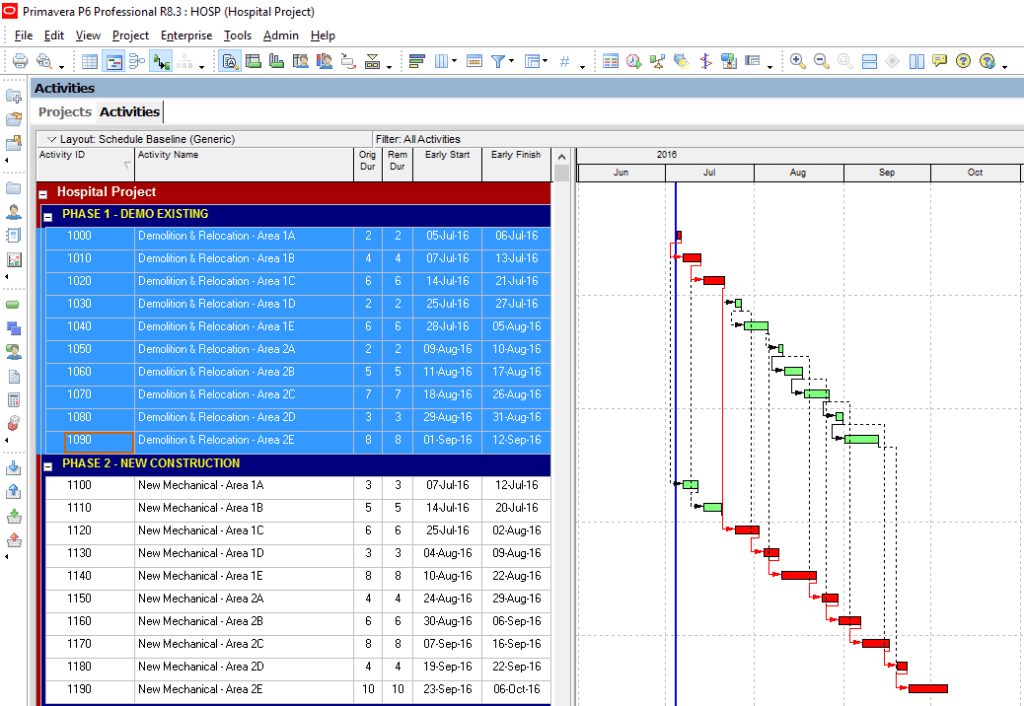
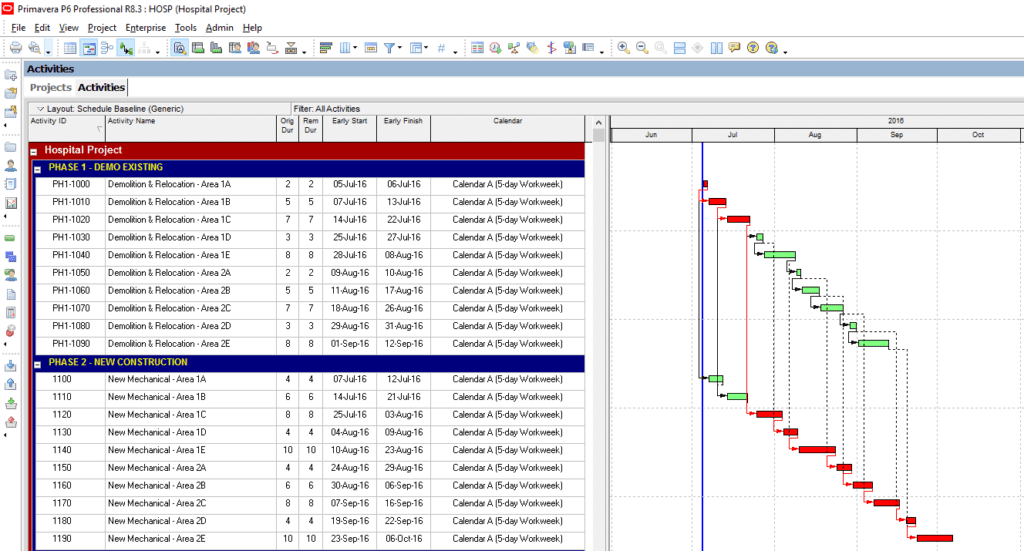
For example, let’s assume you have a group of activities belonging to 2 different phases of your project and whose IDs are entirely numeric. If you needed to update their IDs to reflect the phase each line item belongs to through an alphanumeric ID, you’d do the following:
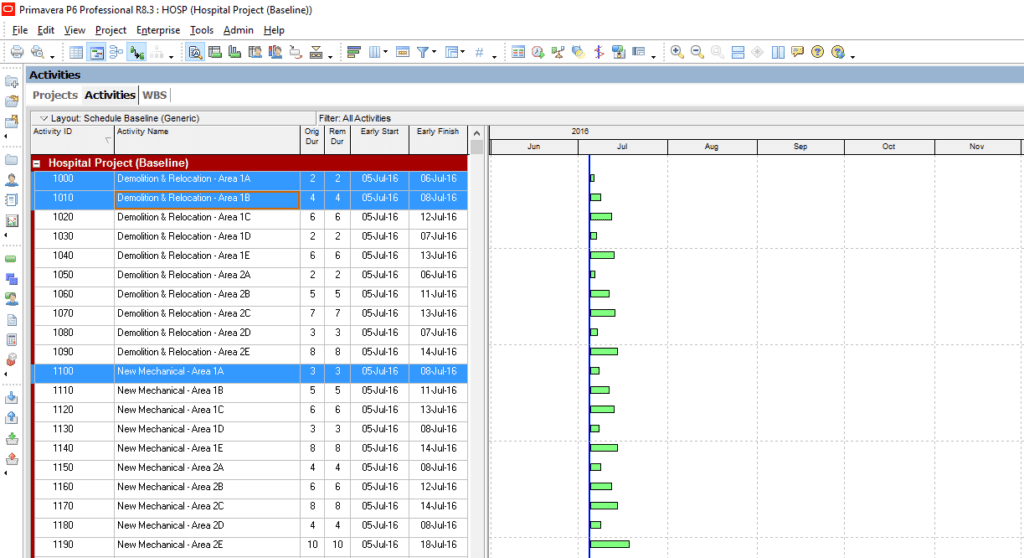
a) Highlight all activities occurring during phase 1 of the project, as shown in Figure 3.1 below.
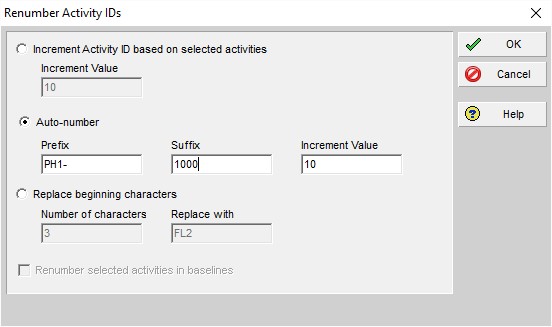
b) Right-click, choose “Renumber Activity IDs” and check the “Auto-number” option.
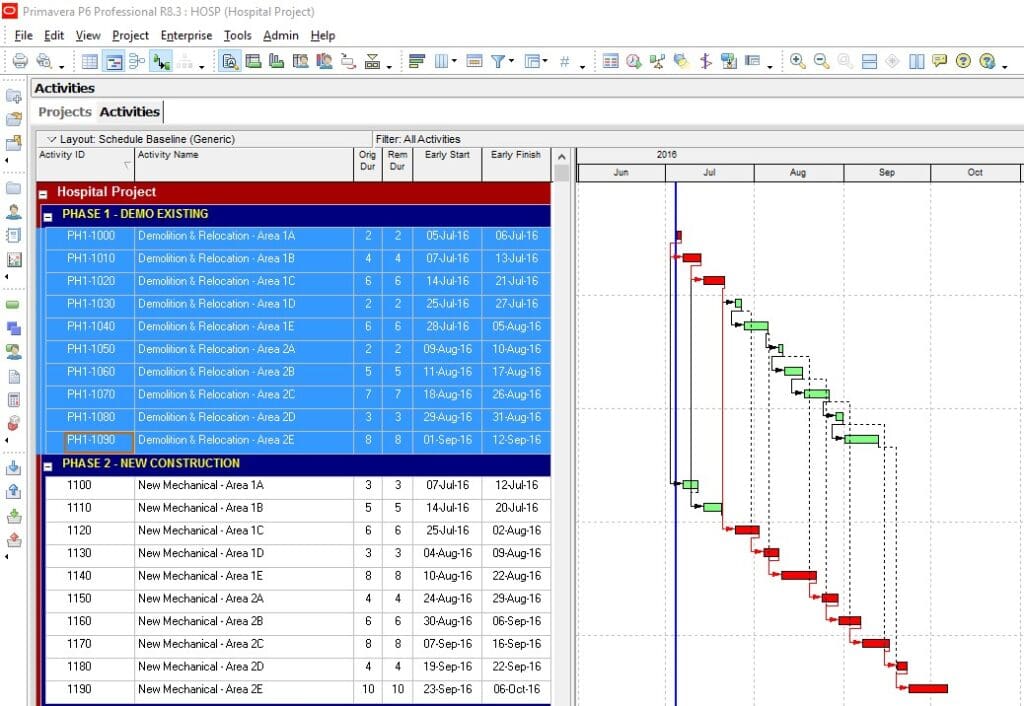
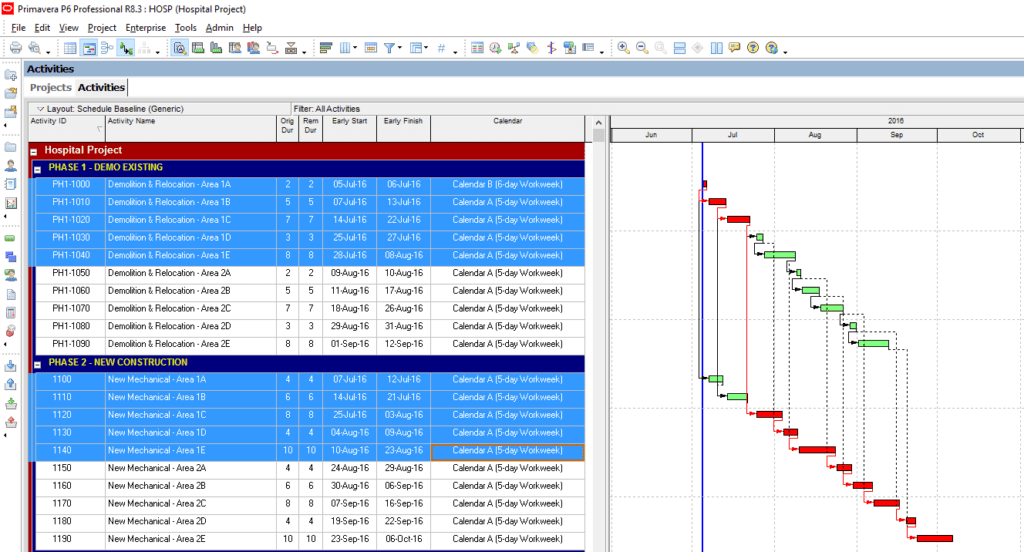
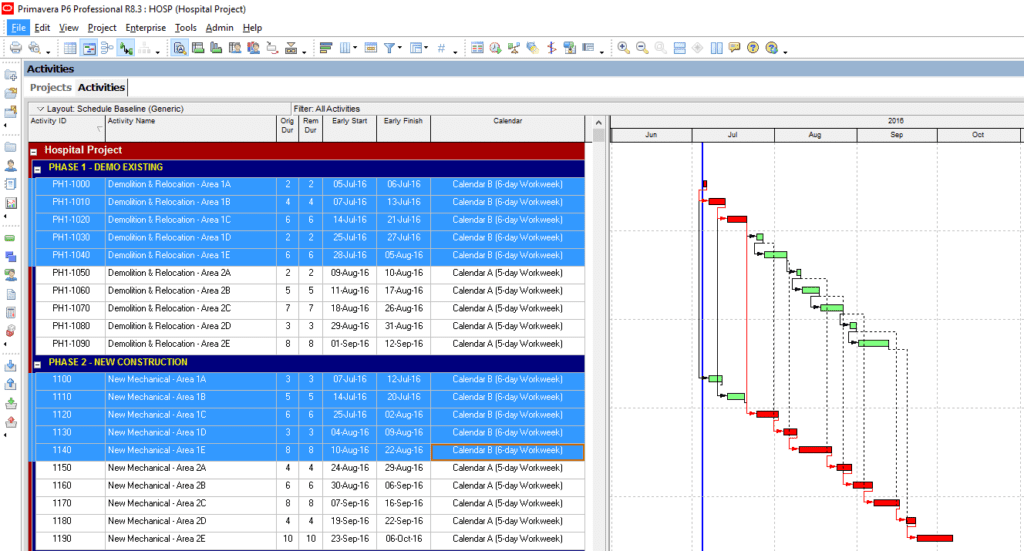
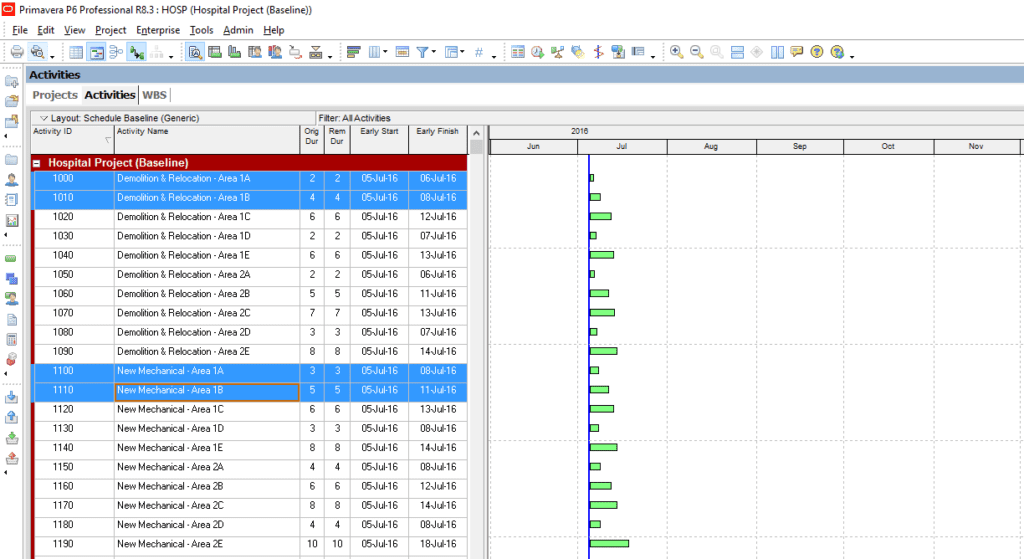
c) Pick a prefix such as “PH1-”, a suffix “1000” and an increment value of 10. Click Ok to see the updated codes for your activities (ie: PH1-1000, PH1-1010, PH1-1020, etc), as shown in Figure 3.2 and Figure 3.3 below.
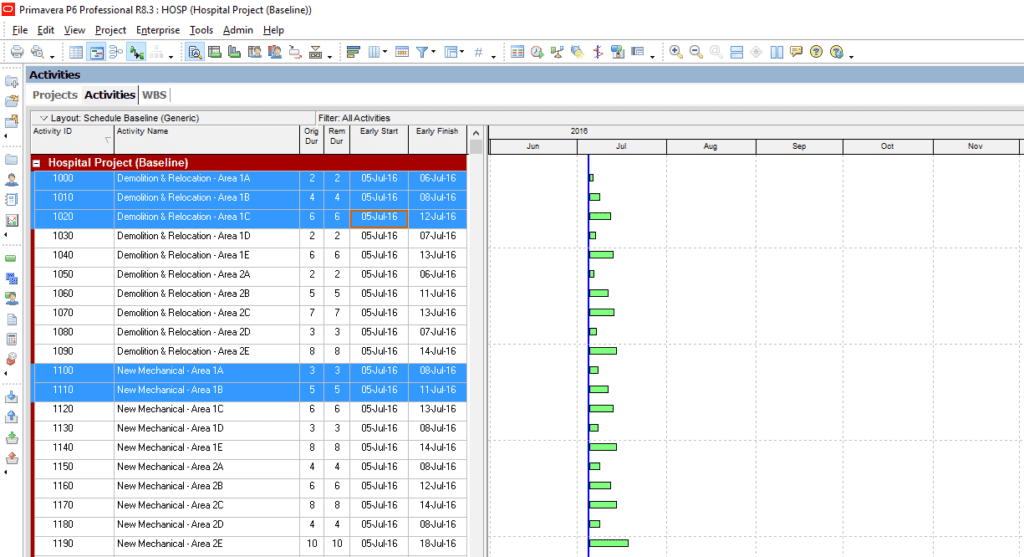
d) Proceed in the same way for phase 2 activities, using “PH2-” as a prefix to denote they belong to phase
4. Fill Down Information
You can use this command to quickly copy WBS and Activity Code values (as well as almost any parameter that can be displayed as a column in the Activity Table) from one activity into other activities in the schedule. For instance, if you’d like to change the calendar for multiple activities, you need to:
a) Display the Calendar column in the Activity Table, as shown in image 4.1 below.
b) Change the calendar ID of the first activity in the range to the desired calendar.
c) Highlight all the activities that you need to update calendars for. Note that the activities you select don’t need to be listed consecutively in the Activity Table (ie: gaps in the range are allowed as well). Also, ensure that the cell containing the desired calendar ID (ie: the value that will be copied onto the rest of the activities in the highlighted range) is the first item in that selection, as shown in image 4.2 below.
d) Click Edit>Fill Down, press Ctrl+E, or right-click on the range and select Fill Down. The calendar for all activities in the highlighted range will be updated to match that of the first cell in the range, as shown in Figure 4.3 below.
5. Disable Auto-Reorganization
If you’re using a layout that groups activities by a certain parameter (eg: WBS, calendar, or a particular activity code), editing the value of this parameter for multiple activities can become a cumbersome task. Why? Because every time you update this information for one activity, it automatically gets moved to its new “location” in the schedule, forcing you to make edits on a per-activity basis.
This problem can be easily avoided by disabling the auto-reorganization option, which you can access through the corresponding button in the “Tools” toolbar, or the Shift+F12 hotkey. This way, you can work on editing the values of a particular parameter at the activity table level without any of your activities moving around until you’re done making changes. This can be particularly helpful if you’re using the Fill Down tool to copy information from one activity into multiple activities.
6. Update Parameter Values For All Activities In the Schedule
There are several data fields and activity settings that can be edited at once for all the activities in your schedule through P6’s Global Change tool. In order to access this feature, click the Tools menu, and select Global Change. You will be prompted to create or modify an existing rule.
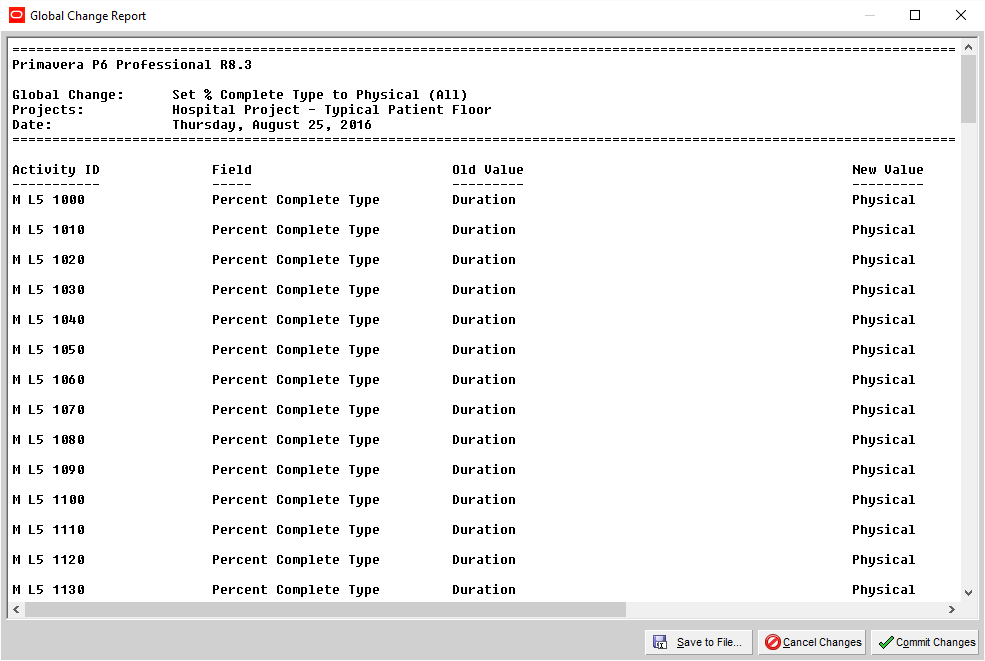
For instance, let’s assume you’d like to change the percent complete type for all activities in the schedule from Duration to Physical. After adding a new Global Change, you’d need to select “Activities” in the subject area (note that you can also implement global changes on resource assignments and project expenses), and then create a rule for P6 to apply across the schedule, as shown in Image 6.1. This rule is set up as follows:
– Box #1: If Parameter, “Percent Complete Type” equals “Duration.”
– Box #2: Then Parameter, “Percent Complete Type” equals “Physical.”
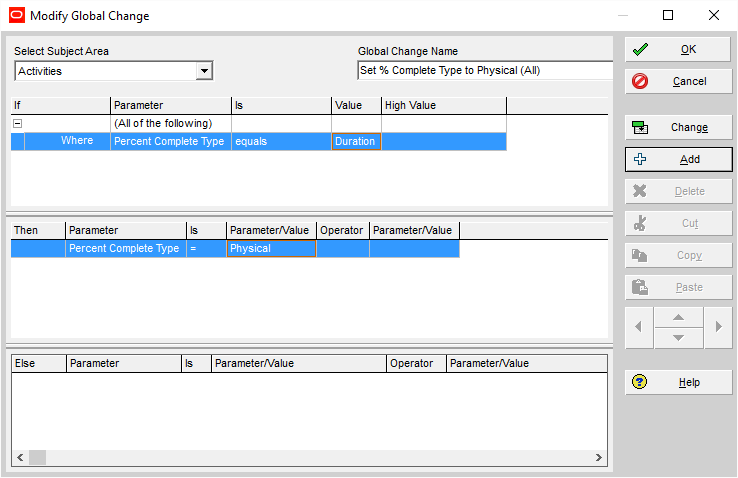
Next, click the Ok button and select “Apply Change”. You will see a log with all the proposed changes, as shown in Figure 6.2 below. Finally, click “Commit Changes” to update all parameter values to the new values.
Note that you can add multiple rules and use two logic operators (ie: apply changes if “any” or “all” of the rules created apply) to customize the Global Change you’re trying to implement. In this case of this tip, we only used a single rule; but the tool can clearly be utilized to implement more intricate and complex changes to the schedule.
7. Change Time Units & Dates Format
In order to control the way in which these values are shown in the system, you may click Edit>User Preferences and navigate between the Time Units (Figure 7.1) and Dates (Figure 7.2) tabs on the left-hand side of the User Preferences window. For instance, this comes in handy when engaging in higher-precision scheduling efforts, which could require tracking activities down to the hour. Conversely, you could set units to weeks, months, or even years if you’re working on less-detailed, higher-level schedules.
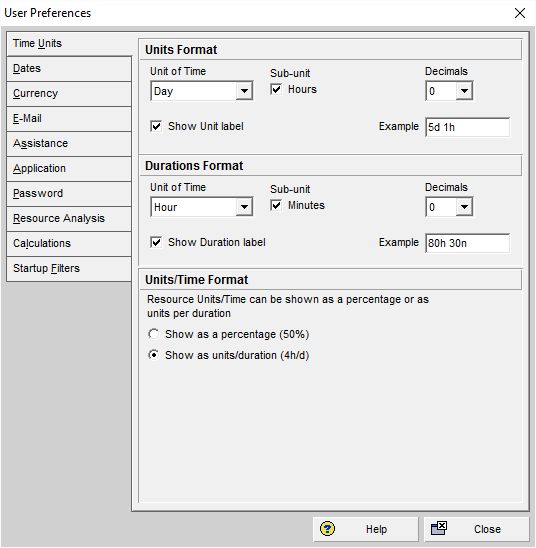
As you adjust the settings on the Units Format window, you can see the resulting format on the right-hand side of the window, within the “Example” boxes. Similarly, changes made to the date format can be visualized at the bottom of the “Dates” window, in the “Sample” box.
8. Export to Excel
Unlike P3, Primavera P6 allows you to export information directly into a spreadsheet by copying and pasting the desired information, just like you would do on any other program. To export the entire Primavera Schedule, press Ctrl+A to select all the information displayed on the Activity Table, then press Ctrl+C to copy and Ctrl+V to paste directly to the spreadsheet.
Alternatively, you can always stick to the traditional method by i) right-clicking on your selection and choosing “Export to Excel” or by ii) clicking File>Export, and choosing the Spreadsheet (xls) option.
9. Compara Schedules With Claim Digger
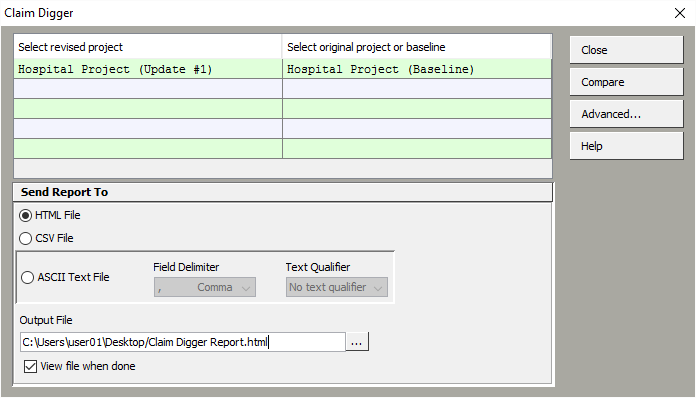
Have you ever lost track of the changes made from one schedule revision to another or needed to put together a comprehensive variance report? In these cases, the Claim Digger utility that comes with Primavera P6 can be particularly useful.
In order to run the Claim Digger utility, all you need to do is go to the Tools menu, and click “Claim Digger.” You will then be prompted to pick 2 files: one for the original project (or baseline) and another containing the revised project, as shown in Image 9.1 below. Click compare and you’ll get a comprehensive report of all the differences between both schedules from durations, float, and logic to activity additions/deletions and WBS changes.
Have you ever done a significant amount of work in Excel as part of the initial planning process for your project (eg: define WBS, activities, activity codes, etc.), and needed to find a way to incorporate all the information without having to create activities one by one? This is where the Import function comes in handy. All you need to do is go to File > Import > Spreadsheet – (xls) and choose the file containing the information you’d like to import.
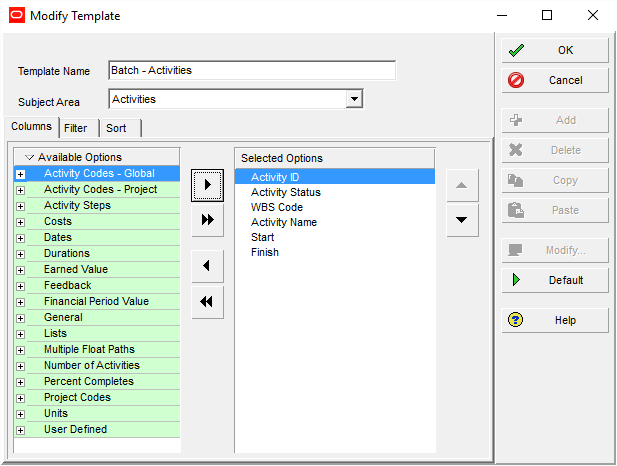
It’s very important to make sure your spreadsheet follows a specific format that Primavera P6 can read and import. Therefore, it’s a good practice to create a template first, which you’ll then dump your data on and import. In order to do so, simply go to File> Export and check the Activities box in the Export Type window. You will be prompted to select the fields (ie: columns) that you’d like your Excel template to display. This can include activity ID, name, durations, WBS activity codes, and even other information such as predecessors/successors, resources, etc., as shown in Figure 10.1. Once you’ve picked your columns, you can export the template and save it to a known location. You can now open the file and dump your data into the columns you selected. Save the updated template, and proceed to import as instructed above.
11. Open Multiple Schedules Simultaneously
When deciding on the granularity and level of detail of your schedules, remember that P6 allows you to work on several projects at the same time and created logic ties between them. This feature gives you the flexibility to split the work into multiple, smaller schedules, without compromising the articulation between them.
For instance, given the magnitude of a particular project, you may decide that it’s better to create multiple sub-schedules that feed into a master schedule by establishing ties between the former’s more granular items, and the latter’s higher-level, summary milestones and activities. Cross-project ties can be created by opening multiple schedules at a time and proceeding to assign links as though you were working on a typical, larger schedule. To open multiple projects simultaneously, simply go to the EPS, hold the Ctrl key to add the desired projects to your selection, and press Ctrl+O.
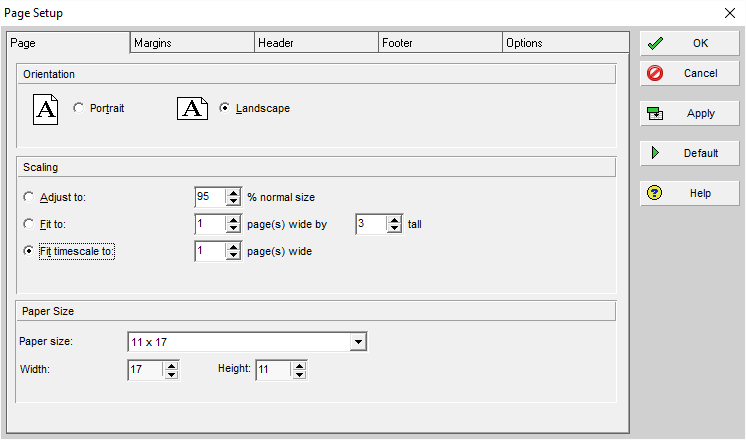
12. Scale to Single-page Width
This simple yet useful tip will spare you the (quite recurrent) pain of seeing your schedules printed on more than 1 page wide (ie: “horizontally” split into 2 or more parts). To scale your project so it doesn’t exceed a width of 1 page, click Print Preview>Page Setup. Make sure you do this from the Activity List view (not EPS). Then, select “Fit Timescale To” and make sure “1” is selected, as shown in Figure 12.1. Similarly, you may choose the “Fit To” option and enter the same value. In this case, however, you’ll also be prompted to fit the schedule to a given number of pages tall.
13. Creating Logic Ties In The Activity Network
When developing the logic for your schedule, remember links can be created in three ways, which you can use to expedite your workflow:
1) Visually: by clicking and dragging your cursor from one bar to another in the Gantt chart.
2) At the Activity Details level: by going to the predecessors and successors tabs in the activity details window and adding activities to each list.
3) At the Activity Table level: by highlighting the activities you need to connect, right-clicking on the selection, and choosing the “Link Activities” option.
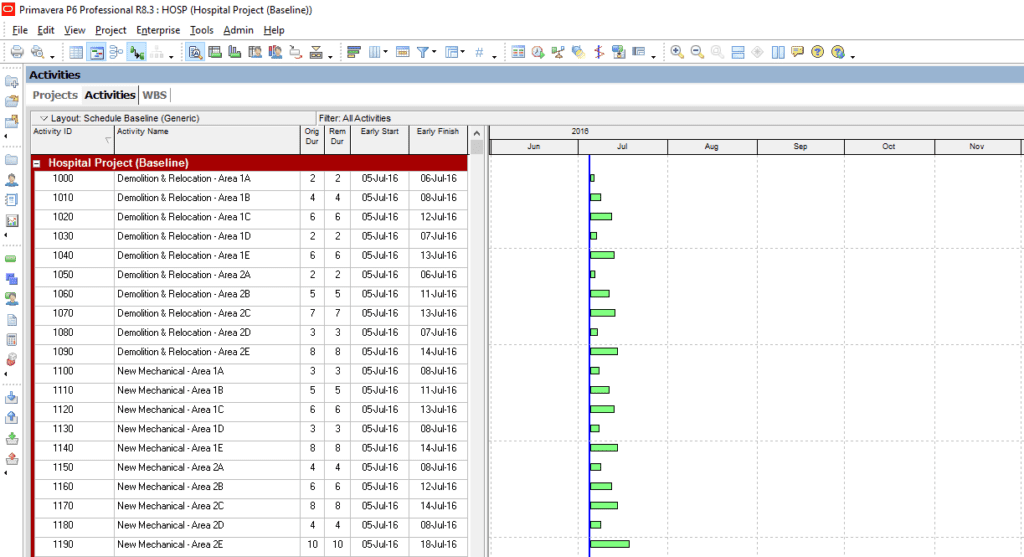
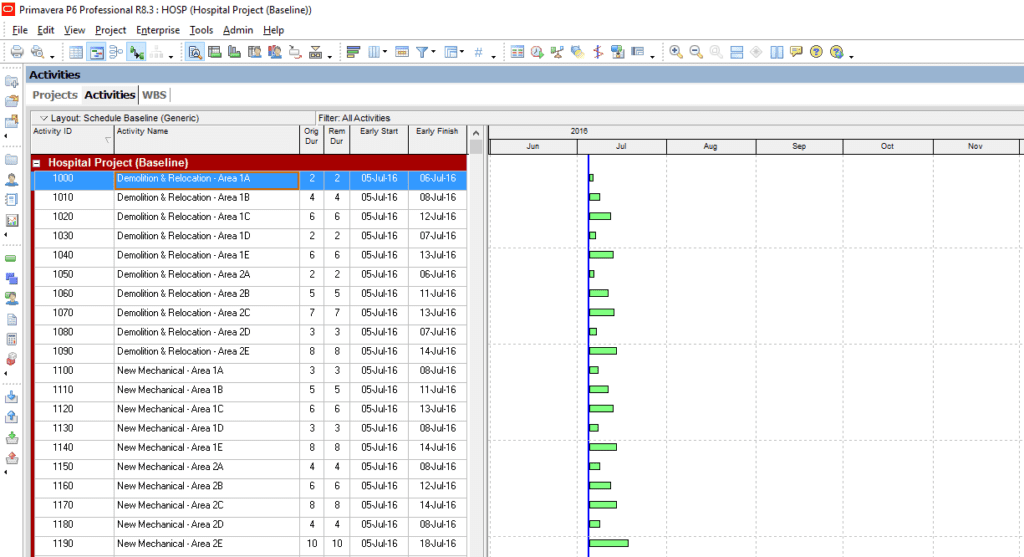
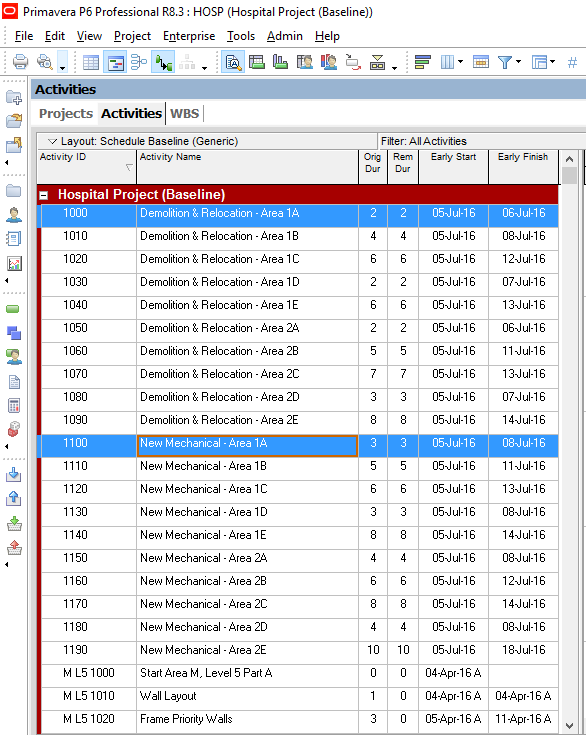
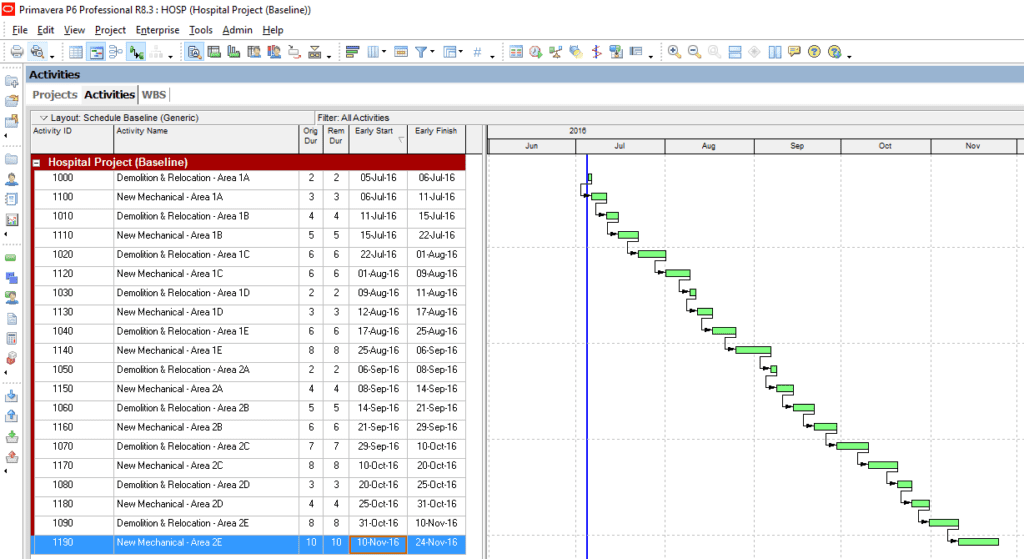
14. Quickly Sequence Activities In Any Order
Linking activities at the Activity Table level is a very powerful tool for creating logic ties (more so than the visual or activity detail methods). A very useful tip when creating chains of activities is to highlight as many activities as needed in the order in which they are to be sequenced. After doing so, just right-click the selection and choose “Link Activities” from the drop-down menu. After running the schedule, you’ll see that they follow the order in which they were highlighted when creating the links, as opposed to the order in which they were originally listed in the activity table (ie: by activity ID, alphabetically, by WBS, or any other criterion). Images 14.1 through 14.3 illustrate these steps:

15. Import a Newer XER File Into An Older Version Of P6
Primavera returns an error message when trying to import an XER file created in a newer version of P6 (for example, when trying to open a P6 15.0 file from P6 8.3). In order to solve this problem, simply follow these steps:
a) Open the XER file you’re trying to import using Notepad.
b) Locate the second string of characters (or “word”) on the very first line (or “sentence”) of the document, as shown in Image 15.1 below. This is where the file version is specified.
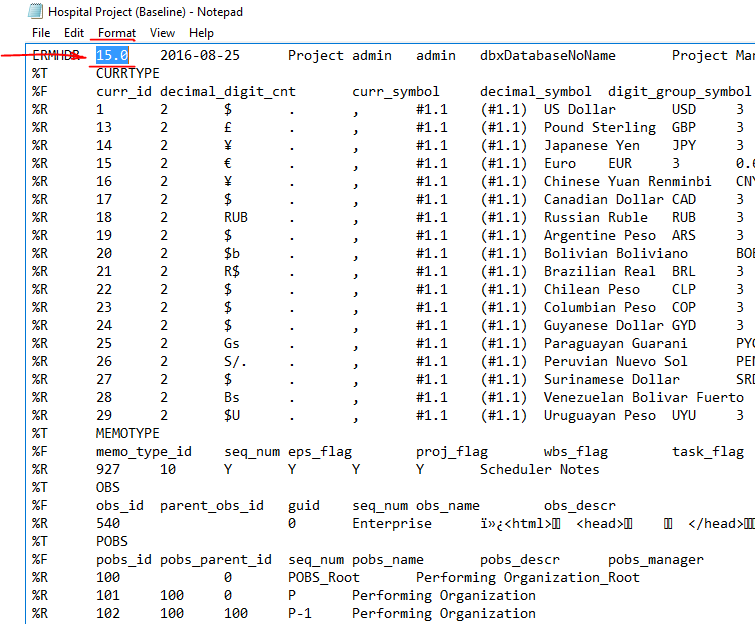
c) Edit this number to match your version of P6. In this example, you’d replace “15.0” by “8.3”.
d) Save the file. Make sure the extension remains as .XER and is not changed to .TXT.
e) Import the updated XER file.
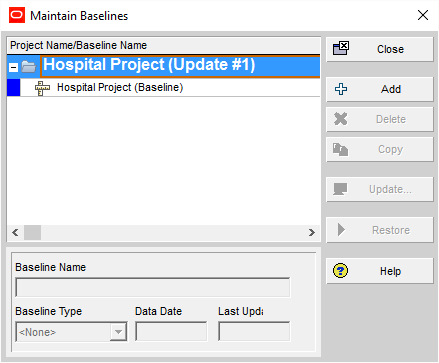
16. Reporting Project Varience
Maintaining and assigning baselines is a very useful P6 feature that allows you, amongst other things, to easily report variances across different schedules. All you need to do is to add the project against which you’d like to compare your current schedule to, and then add variance columns to the activity table displaying the desired changes in the schedule.
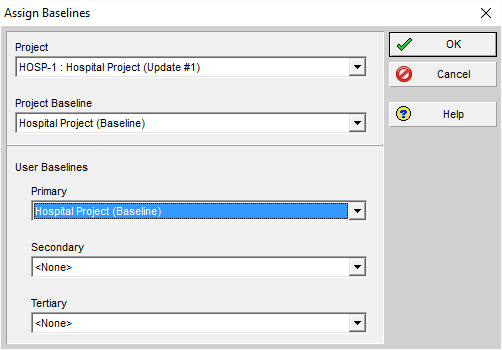
First, pick your baseline(s) by going to Project>Maintain Baselines (see Image 16.1). Here you’ll be able to choose from your other projects in the EPS or save a copy of the currently open file to serve as one. Each baseline can be named and assigned a baseline type (ie: initial planning baseline, customer sign-off baseline, etc.). Once you have a list of potential baselines (or target/reference projects to compare your current schedule to), you can go to Project>Assign Baselines (see Image 16.2). A window will pop up and you’ll be asked to select a project baseline, as well as up to three user baselines (primary, secondary, and tertiary).
The last step is to have P6 display the calculated variances for you. To do this, simply add columns to the activity table (right-click> columns) and pick the variance-related fields that best suit your reporting needs. Options include columns like “Variance – BL Project Duration” and “Variance – BL Project Labor Cost”.
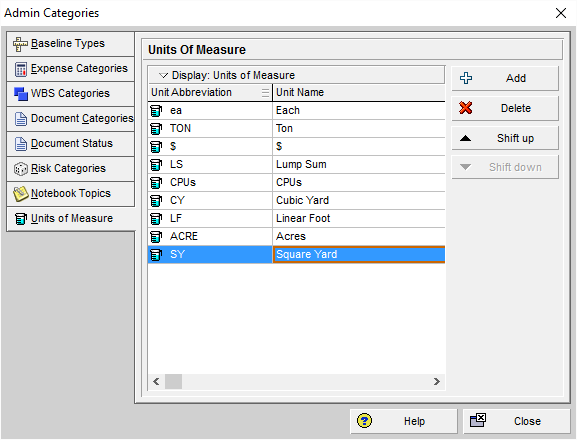
17. Creating Custom Units of Measure
By default, Primavera has only a few options to choose from when it comes to defining and assigning Units Of Measure (UoM) for material resources in the schedule. This is a very common issue that you might encounter in virtually every project you work on, as materials (and therefore their units) can widely vary depending on project type, cost-management requirements, measuring conventions, etc.
For example, when looking through a construction budget you might see that timber matting is measured by square foot; while on a similar project, its UoM can be square yards – a unit that might not be available by default in P6. Similarly, activities such as seeding and stabilization might require an area UoM other than the traditional square foot, such as acres.
In order to create custom UoMs, go to Admin>Admin Categories. On the Admin Categories window, go to the Units of Measure tab. Select “Add” and assign your custom unit, an abbreviation, and name. The new UoM will be listed in the dropdown menu when creating or modifying material resources, as shown in Image 17.1 below.
18. Rule of Thumb: Longest Path Vs Total Float <= 0
You may have noticed that P6 offers two criteria for determining the critical path in your schedule (F9 hotkey>Schedule Options): i) Total Float Less Than Or Equal To (typically zero) and ii) longest path. While both can yield the same results under certain conditions, most times critical paths can differ dramatically when calculated under one criterion over the other. Below are a few notes that will help you decide which of the 2 to use.
The intent of the Critical Path Method (CPM) is to allow you to obtain the total project duration by finding the longest sequence (ie: “path”) of activities from project start through completion. If we’re working on a schedule baseline, then both methods will lead to the same result. In other words, activities in the longest path will also be those with zero total float (TF). This continues to hold even when we add constraints to our baseline to account for intermediate and final project deadlines (eg: building dried-in, substantial completion, and final completion milestones); as by definition, a baseline shows no delays and hence no negative float.
Now, let’s assume we update the schedule and find that there is a delay relative to the original completion deadline, as well as some of the intermediate milestones we incorporated earlier into the baseline. As you may expect, these unsatisfied constraints generate negative TF values. Evidently, each of the 2 critical path calculation criteria will yield completely different results this time around. The Total Float Less Than Or Equal To (zero) method will include any activity with a negative TF value; while the Longest Path method will continue to show the longest progression of activities leading to project completion.
This means that, if a 100-activity schedule is delayed and 80% of its activities have negative TF values, then the critical path determined through the first method will be comprised of 80 line items, and will not necessarily let us distinguish which activities have an impact on the current project completion forecast. The Longest Path option, on the other hand, will continue to show only the activities that drive our current completion date and keep the list of activities considered “critical” to a minimum.
In conclusion, the Total Float Less Than Or Equal To rule is valid for calculating total project duration (ie: the longest sequence of activities leading to your project completion milestone) as long as you don’t have unsatisfied constraints generating negative TF values. However, chances are you’ll be in the latter scenario most of the time, as you’ll for sure need to add constraints to your schedule; let alone update it on a regular basis and probably even show delays on more than one occasion. In these cases, the Longest Path option would be the recommended setting for calculating total and remaining project duration.
19. Import & Export Layouts
Setting up layouts can be a cumbersome task, especially if you have to replicate someone else’s layout to make sure you’re looking at the same report and data, or just to be consistent with reporting formats. You can save you and your team a lot of time by setting up a layout (ie: report) once, exporting it, and having the people involved in the project import it without having to re-create it on their own every time you send them a schedule.
To do this, go to View>Layout>Open and select the layout that you’ve previously set up for your project. Once you select “Export,” you’ll be prompted to specify a location for the .plf file (Primavera Layout File) that was just created. That is the file that you should send to anyone who needs to see the schedule under the specific format (ie: layout) that you’ve created.
Similarly, when the recipients of the .plf file have already opened the schedule, all they need to do is go to the same menu and select “Import” this time (View>Layout>Open; Import). Once they’ve imported it, it will be listed on the Open Layout list for them to use.
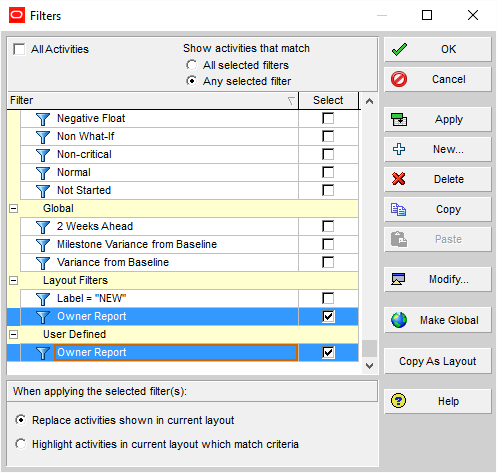
20. Export Filters
Similar to Layouts, Filters can be exported for the same reason: making sure everyone involved in the project is able to see the same data and save time to set up complex and sophisticated filters. P6, however, doesn’t have an option to directly export a filter as an isolated element. Instead, you’ll need to incorporate it into a layout and export it as part of the layout.
Once you’ve created a layout and a filter, open the Filters window. This can be accessed by right-clicking on the activity table and selecting Filters, pressing the funnel icon on the toolbar, or by clicking View>Filter By>Customize. Once there, select the desired (ie: previously created) filter from the list and press the Copy As Layout button, as shown in Image 20.1 below. Now the filter will be listed under “Layout Filters” and will be exported together with the current layout (ie: the layout that you previously created and which you wish to send to your project team).
21. Adding Granularity to Your Schedule Without Bumping Up Activity Count
One of the advantages of adding more detail to a schedule is that it allows for finer progress tracking. In other words, reporting status on a deliverable that is represented by more than 1 activity in the schedule can be a more structured, traceable, and overall reliable process than for a single-line-item one.
For instance, think of the effort associated with preparing as-built drawings during the closeout phase of a project. This can be either incorporated into the schedule as a single item representing all work from the final as-built survey through record drawing set approval, or it can be broken down into the smaller tasks (or “steps”) implied by this effort. At the same time, however, the latter can result in an unnecessary number of new activities that can make your schedule unmanageable and very cumbersome to update.
If you’ve been faced with this dilemma, fortunately, you can get the best of both worlds by using the Activity Steps feature. This option allows you to create sub-tasks (namely, “steps”) for the activities you need to track more closely without the need to break them down into separate, smaller activities. In order to do this, select the activity you need to create steps for. Then, go to the Steps tab located in the Activity Details window and define the sub-tasks required for this activity as shown in Figure 21.1.
As shown above, you can record progress under each Activity Step, and even assign weights to drive overall activity progress calculation. If the latter is the case and you’d like P6 to do this automatically for you, make sure to activate the “Activity Percent Complete Based on Activity Steps” setting. This option can be found under the Calculations tab at the project-level settings, as shown in Figure 21.2 below: