30 Navisworks Tips & Shortcuts
Need help in detecting clashes with Navisworks? Our team at VIATechnik can create custom clash tests to test scenarios unique to your project. Contact our Navisworks clash detection consultants to get started or visit our BIM services to find out how we can help you with your projects.
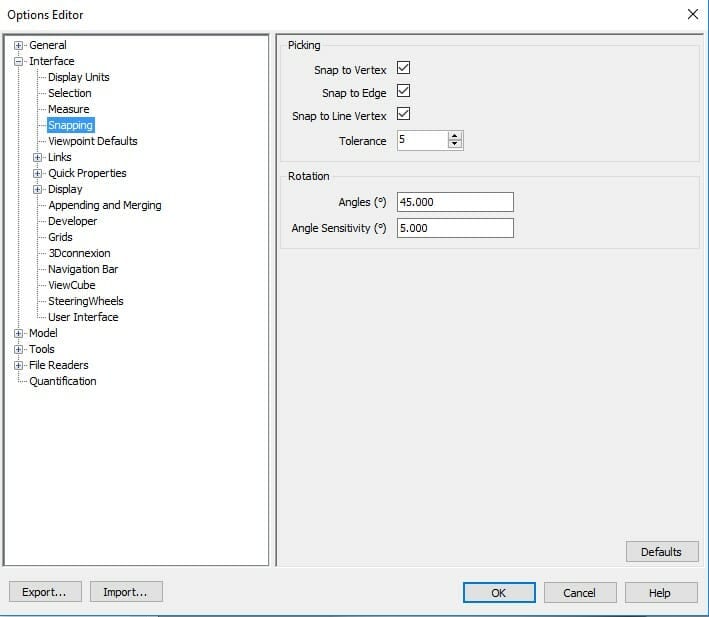
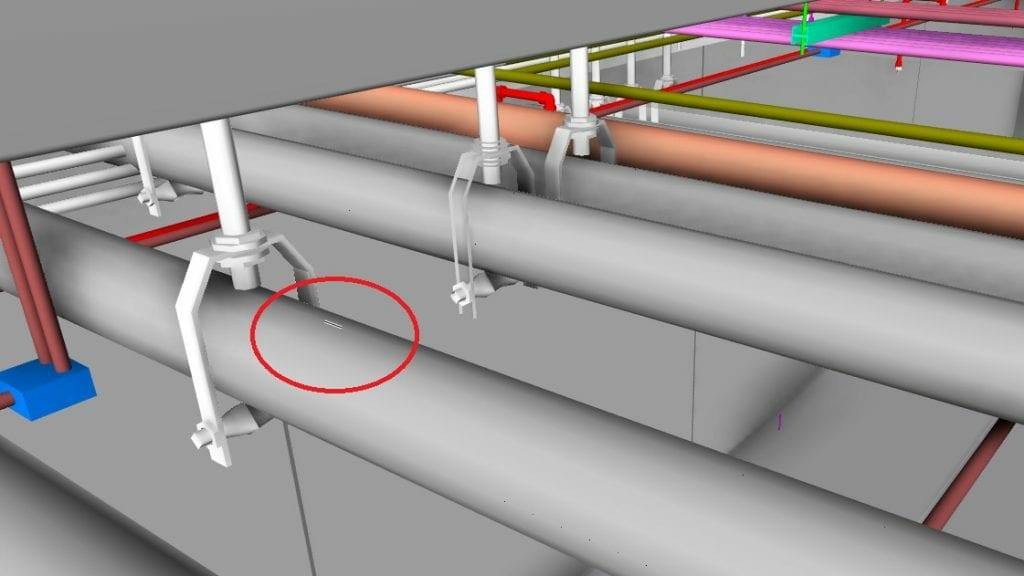
1. Measuring Rounded Objects
If you’re having issues measuring rounded objects accurately, such as the bottom sides of pipes, turn on Edge Snapping. Go to Navisworks Options Editor and under Interface>Snapping, Make sure “Snap to Edge” is enabled. This will allow you to snap your measurement tool to the edges of vectors, which is conveniently usually located on the bottom and topmost sides of cylinder-shaped objects.
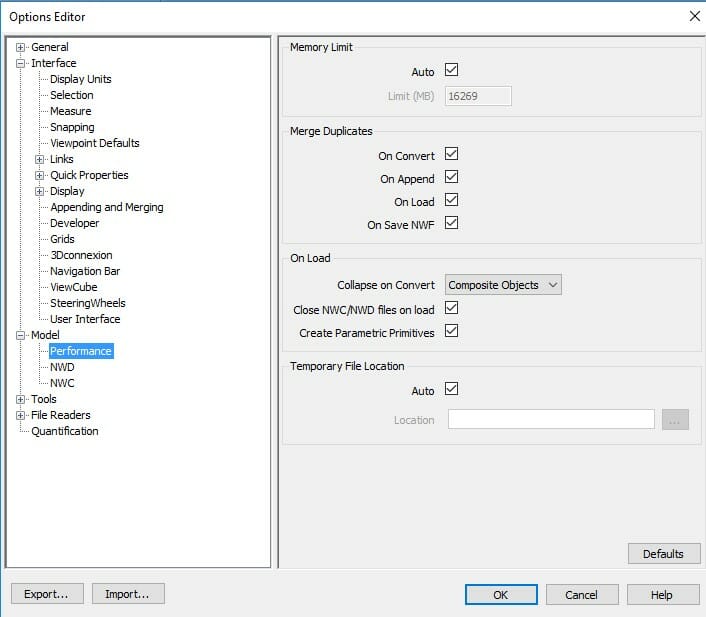
2. Quick Iterations of Navisworks Models
If you’re working on doing quick iterations of Navisworks models from AutoCAD or Revit, and have to continually unload your appended models in order to export the models from your modeling program, there is a convenient workaround to this. Under Options Editor>Model>Performance, make sure “Close NWC/NWD Files on Load” is checked. Now you can overwrite NWC files without unloading them in your NWF file. After overwriting these files, simply click refresh in Navisworks’ Home tab and a newer version of the model will replace the older version you were previously viewing.
3. Measure Tool Shortcut
Know your shortcuts for the measuring tool. With The measure tool active, press CTRL+SHIFT+Z to snap to the Z axis, CTRL+SHIFT+Y to snap to the Y Axis, and CTRL+SHIFT+X to snap to the X Axis.
4. Selection Tool Shortcut
Similarly, learn to quickly switch to the selection tool by pressing CTRL+1.
5. Select Box Tool
Select multiple objects quickly by using the select box tool instead of the selection tool. Holding SHIFT while using the select box tool will select all objects that touch the box you made, not just the ones fully surrounded by the selection box. Additionally, hold CTRL+SHIFT and you can multi-select groups of objects.
6. Multiple/Single Objects Clash Grouping
Are multiple objects clashing a single object in the clash detective and require you to group them all at once? Under the Items drop down window in the clash detective Results tab, right click the single element that has multiple clashes, and the option to group all clashes associated with the object will be available to you.
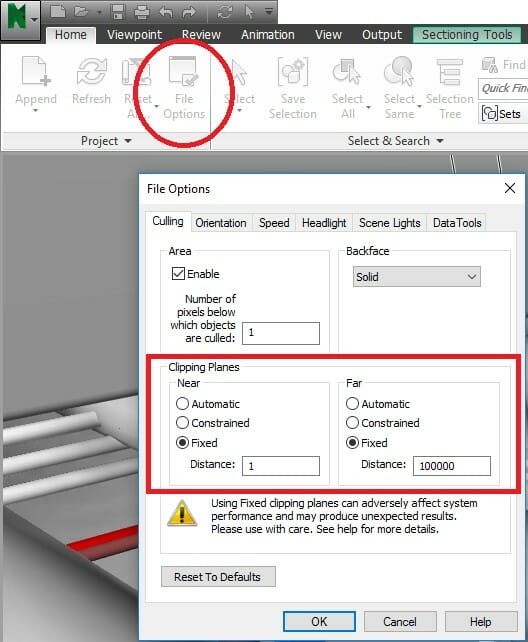
7. Clipping Planes
When navigating through the model, does your model suddenly disappear or go blank? Your clipping planes may be the troublemaker. Under the Home tab, click File Options and under the Culling tab, change you Near Clipping Plane to Fixed and enter a low number (.01 for example), and change your Far Clipping Plane to Fixed and enter a extremely high number (9999 for example). This should now fix your views. If your model starts flickering after this change, then your clipping plane numbers may be too high or low. Adjust accordingly until you get a good view.
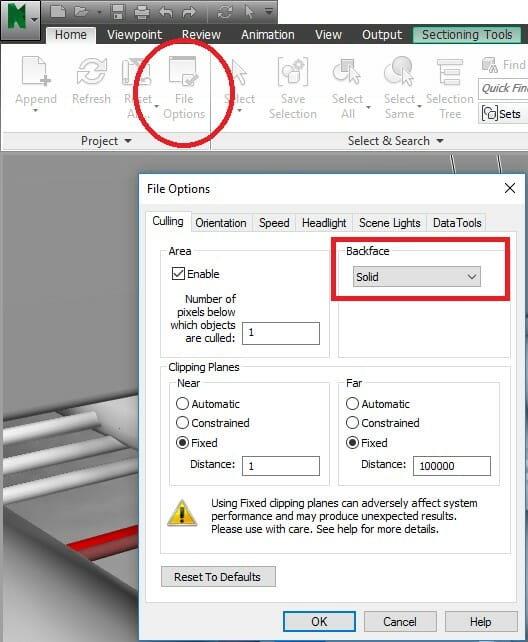
8. Backface
If you have models where only one side of a face of an object is visible and the other side is invisible, your backface is set to off. Go to Home > File Options and under Culling, change your Backface to Solid.
9. Show Quick Properties
You don’t need to have the Properties window open in Navisworks to see identity data for objects. Under Options > Interface > Quick Properties, you can enable “Show Quick Properties.” Now when you hover over an object, some properties of the object will appear over your cursor. To customize what properties appear, under Options>Interface>Quick Properties>Definitions, you can define what parameters are shown.
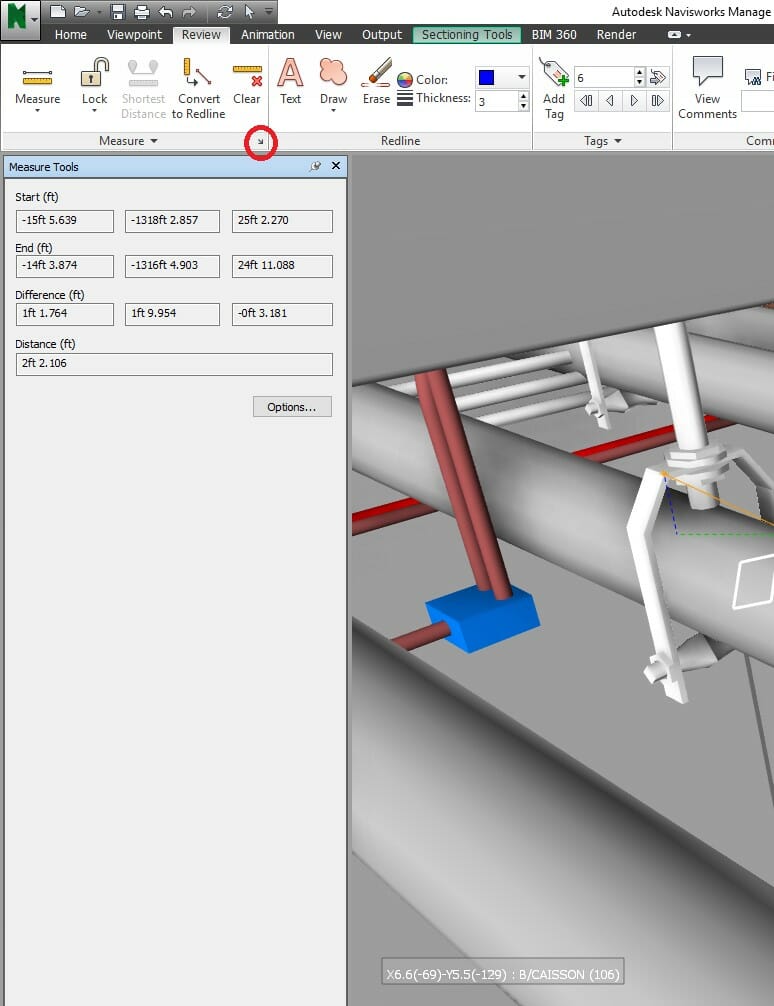
10. XYZ Coordinates
Need to determine the X, Y, and Z coordinates of a point in the model? Under the Review tab, Measure Section, click on the arrow at the bottom right side of this section and the measure tools window will appear. When you use the measure tool, the start and end point’s coordinations will show in this window, as well as the difference.
11. Redline Active Tool
Need to do quick redline markups on the fly? You don’t have to click “Save Viewpoint” prior to marking up view points. Simply have any redline tool active, and each time you mark up a view with no redlines on it shown, Navisworks will create a new viewpoint with these markups in the saved viewpoints window.
12. Top And Bottom Selection Pane
Trying to find an optimal path for your pipe or ductwork within a plenum space? Create a top and bottom section plane using the sectioning tool, such that the distance between the planes are set to be the height of your ductwork or pipe. Link the section planes and adjust the plane until you find an elevation with a clear path for you to run your trade.
13. Move An Object, Clear A Clash
Need to know how much to move an object in AutoCAD or Revit to clear a clash in Navisworks? Rather than using the measuring tool, select the object, and under the Item Tools tab, use the Move tool to move the object in Navisworks such that it isn’t clashing any other object. Just below the Move Tool icon, you can click the Transform drop down menu and a X, Y, and Z distance of change between where the object originally was and where you adjusted it will be shown. Use this number to move your objects in AutoCAD or Revit more accurately. Once you’re done, don’t forget to Reset Transform your object back to its original location.
14. Open Other Files
Navisworks is an extremely strong tool that can view files beyond NWC’s and NWD’s. If you have CAD, Revit, 3D Max, or even PDF files, throw them into Navisworks and they will open up with no issues.
15. Transparent Dimming
Is your dimmed view in Clash Detective too difficult to read? Your Transparent dimming may be set to high or low. Under Options>Tools>Clash Detective, you can adjust the dimming transparency, and clash colors so they are much easier to read. Note: these transparencies won’t translate to BIM 360 GLUE.
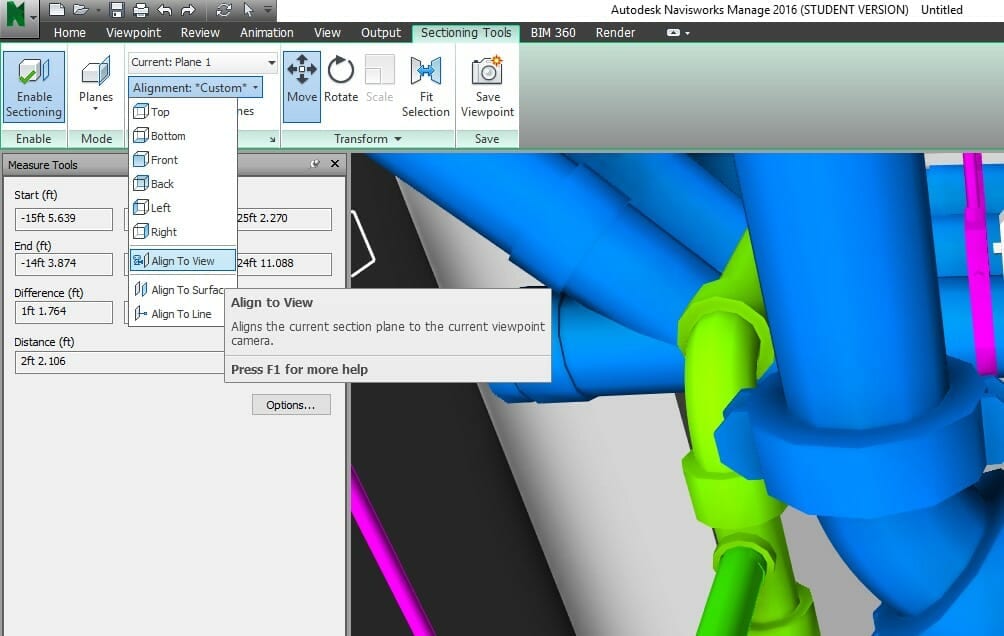
16. Sport Clash After Section Cut
Cannot spot your clash after adding a section cut? Under the Sectioning Tools tab, click on the Alignment and choose “Align to view” from drop-down list and your clash will appear.
17. Add Section Cut To Viewpoints
Want to add a section cut to your viewpoints? You’ll need to write the viewpoints first and then add a section cut. The most important step is to right click the viewpoints and hit “Update.” If you add the section cut first, it will disappear after you write the viewpoint.
18. Override Object Color
Want to override the object color in Navisworks? Right click the object and choose Override Item>Override color. If you want to reset the color and transparency you just created, right click the object again and choose Reset Item>Reset Appearance. This color and transparency change will only show up in Navisworks, not in GLUE.
19. View Clashes From Same Perspective
Want to look at your clashes from the same perspective? Want to look for your clashes when it disappears in the scene? Click your Home button. To set the home view, move the entire building with Ideal Angle, right click the House symbol on the right corner of scene and choose “Set Current view as Home.”
20. Group Same Clash Types
Want to put same type clashes into one group? The Selection Tree can help.! When you click on an object in the scene, it will highlight the object in the Selection Tree. Then click on the highlighted object, use left arrow in the keyboard to go back to higher level until it covers all the clashes you want to group.
21. Reconnect To Server
When you use Navisworks to open up the model from GLUE, check your left bottom status often to make sure you are connected to the GLUE. After you hit the Save button, if you see a window that says “a new updated model has been uploaded by (Null)”, then this means you are disconnected from the server. You can click the BIM 360 Tab and then the Model in the left side to reconnect.
22. Locally Edited Models
What does it mean when you say “locally edited” in your Clashes Detection window or Saved Viewpoints? It means someone else was working on the same model while you are editing the viewpoints or tests. Check those local edits before you save the file, since your model version will cover up the previous version model in GLUE.
23. Corrupt Viewpoint/Scaling Bug
There’s an ongoing bug with Navisworks that results in saved viewpoints being relocated when you open the Navisworks after closing it out. This issue has been brought up to Autodesk, but it looks like there doesn’t seem to be a definite answer (https://forums.autodesk.com/t5/navisworks-general-discussion/saved-viewpoints-shifted-to-wrong-location/td-p/5631288). It seems the underlying issue is not the fact that these views are shifted, but rather the model’s scaling gets changed for some apparent reason. We’ve isolated this issue and determined that models get scaled by 3.28084375 or .3047996418604208 times the original scale. Try overriding your model’s scale, putting these numbers in the scale field for X, Y, and Z, and activating your saved viewpoints to see if this solves the problem. Unfortunately, this is a mere bandaid fix to an ongoing bug.
24. Saved Viewpoints – 1
If you want your saved viewpoints to display all the elements that you required / hide when you created them, then go to Options>Viewpoint Defaults and check the box for “Save Hide/Required Attributes.”
25. Saved Viewpoints – 2
Similarly, if you want your saved viewpoint to display all the materials overrides you did when you saved it, then go to Options>Viewpoint Defaults and check the box for “Override Appearance”. You should know that both of these options increases the file size, so use it wisely.
26. Appearance Profiler
Use “Appearance Profiler” to create a custom appearance for a particular system or family. You can use sets or property values to select a specific group of items. You can also export your saved appearance profiler as a DAT document.
27. Finding NWC File Location
Having a hard time finding where a NWC came from? Open the property window, on the selection
tree, click on the NWC you want to find, and the property window will tell you where the file came from.
28. Render / Animation Tip 1
Want your model to look more appealing when doing an animation? Go to Options>Interface>Display. Under Graphic Systems, unclick “Auto-select” and under system, switch from “Basic” to “Autodesk.” Then go to Interface>Display>Autodesk. Make sure “Screen Space Ambient Occlusion” is selected. Change “Shader Style” to “Phong.”
29. Render / Animation Tip 2
Another trick for a better render / video is to change the level of MSAA to a higher number. Go to Interface>Display>Autodesk, under Multi Sample>Anti Aliasing, change the level from 2x to 4x or higher. This will generate smoother geometries, but be aware that the higher the number, the longer a rendering will take and more memory it will use.
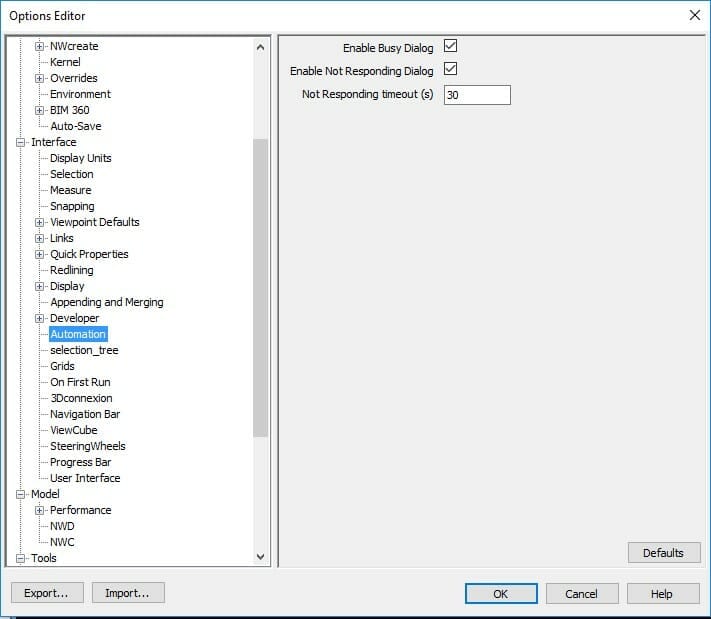
30. Patience
What do you need to do when the Navisworks window is white and a window shows up saying “your Navisworks is not responding”? Use CTRL + ALT + DELETE to open up Task Manager, then take a look at the progress. Sometimes the file is so big that Navisworks needs some time to process. Patience pays off in Navisworks!